Building a Telegram Bot with Python and Gemini AI
March 4, 2024

Telegram bots are a great way to interact with users and automate tasks. In this tutorial, we’ll walk through the process of creating a Telegram bot using Python and integrating it with the Gemini AI API to add advanced conversational capabilities.
Prerequisites
Before we begin, make sure you have the following:
- A Telegram account
- Python installed on your system
- Visual Studio Code (or any other preferred text editor/IDE)
- Access to the Gemini AI API
Step 1 -> Setup Telegram Bot:
- Go to Telegram and search for BotFather.
- Start a chat with BotFather and type /newbot.
- Follow the instructions to create a new bot. Give it a unique name ending with “bot”.
- Once created, BotFather will provide you with a token. Keep this token safe as it will be needed to authenticate your bot.
Step 2 -> Install Required Libraries:
- Open a terminal or command prompt.
- Now on we are following the steps from https://github.com/eternnoir/pyTelegramBotAPI repository.
- Use pip, Python’s package installer, to install the pyTelegramBotAPI library:
pip install pyTelegramBotAPI
Step 3 -> Create Python Script:
- Inside the project folder, create a new Python script file. You can name it main.py.
Step 4 -> Add Telegram Bot Code:
- Open main.py in VSCode.
- Copy the Python code provided in the transcript that sets up the Telegram bot.
- Paste the code into main.py.
import telebot

bot = telebot.TeleBot("TOKEN", parse_mode=None) # You can set parse_mode by default. HTML or MARKDOWN
- Replace the placeholder for the bot token with the token obtained from BotFather.
- Then copy the code for the message handlers.
@bot.message_handler(func=lambda m: True)
def echo_all(message):
	bot.reply_to(message, message.text)
- This lambda function will take a message and reply back to the user the same message. (we will change this reply to Gemini AI response later on)
- Then we add the following code to start the bot.
bot.infinity_polling()
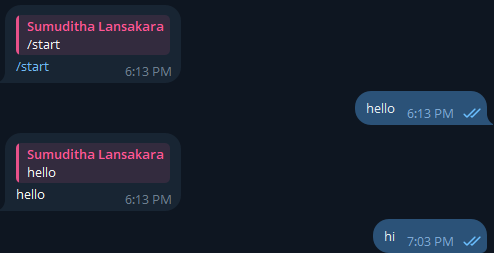
- Now if you run your python file (you will get a blank output in the console) and go to your bot, you can check whether it’s properly connected. For that you can send something and the bot will reply with the same message.

Step 5 -> Obtain Gemini AI API Key:
- Visit the DeepMind website (https://ai.google.dev). Then navigate to google ai studio and locate the section for accessing the Gemini AI API.
- In ai studio you can even create your own prompt as well.
Step 6 -> Integrate Gemini AI Code:
- In main.py, import any necessary libraries for interacting with the Gemini AI API.
- Configure the API key for Gemini AI in your Python script.
- In the upper right conner you have get code option to get the code snippet.
- Copy the code snippet from the transcript that interacts with the Gemini AI API.
- Create a new file named gemini.py and paste the code that you copied.
- You need to install the package for google generative AI pip install google-generativeai using this code.
- After that you need to replace YOUR_API_KEY with the API key that you got from the Gemini AI.
- At the below of the code you have the user message that sending to the Gemini chat bot and after that it will print the response that you are getting.
convo.send_message("Hello! How old are you?")
print(convo.last.text)
- Then you can copy the code from gemini.py and paste it to the main.py. Remember to replace your message_handler lambda function output with the Gemini response that we are getting.
@bot.message_handler(func=lambda m: True)
def echo_all(message):
    convo.send_message(message.text)
    response = convo.last.text
    bot.reply_to(message, response)
- Make sure to use a .env file to keep your secret keys and API keys safe.
- Create a file named .env in the root folder. Add your keys inside .env file as variables.
- Install python-dotenv package. pip install python-dotenv
- Then in the main.py file, import them.
import os
from dotenv import load_dotenv, dotenv_values

load_dotenv()
- You can access your environment varibles using,
os.getenv("API_KEY")
Step 7 -> Run the Bot Locally:
- Save main.py in VSCode.
- Open a terminal or command prompt and navigate to the project folder.
- Run the Python script using the command:
python main.py
- Verify that the bot is running without any errors.
- Your code now should look like this
python-gemini-telegram-chatbot/main.py at main · LaXnZ/python-gemini-telegram-chatbot
Step 8-> Test the Bot:
- Open Telegram and search for the username of your bot.
- Start a conversation with the bot and send messages to test its functionality.
- Ensure that the bot responds appropriately to different inputs.
Step 9 -> Deploy the Bot (Optional):
- If you wish to make your bot accessible to others 24x7 , you’ll need to deploy it to a server.
- Choose a hosting provider such as Heroku, AWS, or DigitalOcean.
- Follow their instructions to deploy your Python script and ensure that it runs continuously.
Congratulations! You’ve successfully built a Telegram bot with Python and integrated it with the Gemini AI API. Happy bot building!
Thank you for reading my article! If you enjoyed it and would like to support my work, please consider making a donation. Unfortunately, I’m not in an eligible country to receive payouts from Medium, so your support would mean a lot to me.
You can donate through the following link: Donate Here
Thank you for your generosity!
My personal website: laxnz.me